How to send Slack alerts from Google Sheets / Google Apps Script.

- |
- |

Over the past few years, there have been several instances where we needed to get information out of our Google spreadsheets and into a Slack message. To do that, we use a few simple Google Apps Script functions, along with the Slack API. In this video, we show you how to do it.
Transcript/instructions.
It’s fair to say, I’m a pretty big fan of Google Sheets and Apps Script. It’s hard not to be. They have the ability to integrate with other Google Services, query external services via Add-Ons and APIs, share data between sheets, import data from around the web and much more. In fact, there are seemingly endless possibilities.
As a result, we run a lot of things through Google Sheets here at August. We also use Slack. Slack works perfectly for both our internal communication (extremely useful during the home working/COVID-19 period) and as a way of connecting and sharing information quickly and transparently with our clients. As a result, over the past few years, there have been several instances where we needed to get information out of our spreadsheets and into a Slack message. To do that, we use a few simple Google Apps Script functions, along with the Slack API.
Here’s how you do it.
How to send Slack Alerts from Google Sheets / Google Apps Script.
- Create a custom app in Slack
- Fetch data from your spreadsheet using Google Apps Script
- Transform the data into a format understandable by Slack
- Send the alert to Slack
- Bonus step: Set up scheduled alerts
Note: You’ll need some basic experience of Google Apps Script and/or JavaScript to understand everything in this article. If you don’t, go and check out the Google Apps Script docs first.
If you’re ready to get started, let’s go through each step in detail.
Step 1: Create a custom app in Slack.
To kick things off, make sure you are logged into your Slack account via your browser. Once logged in, go to https://api.slack.com. Everything you need to know about the Slack API is here.
To set up your new custom app, click on ‘Your Apps’ in the main nav:
The Slack API home screen
Followed by ‘Create New App’:

Your Slack Apps
A modal will load, where you can provide a name for your App. Select your company’s development workspace (if you are only a member of one company, there should only be one option here), and hit ‘Create App’:
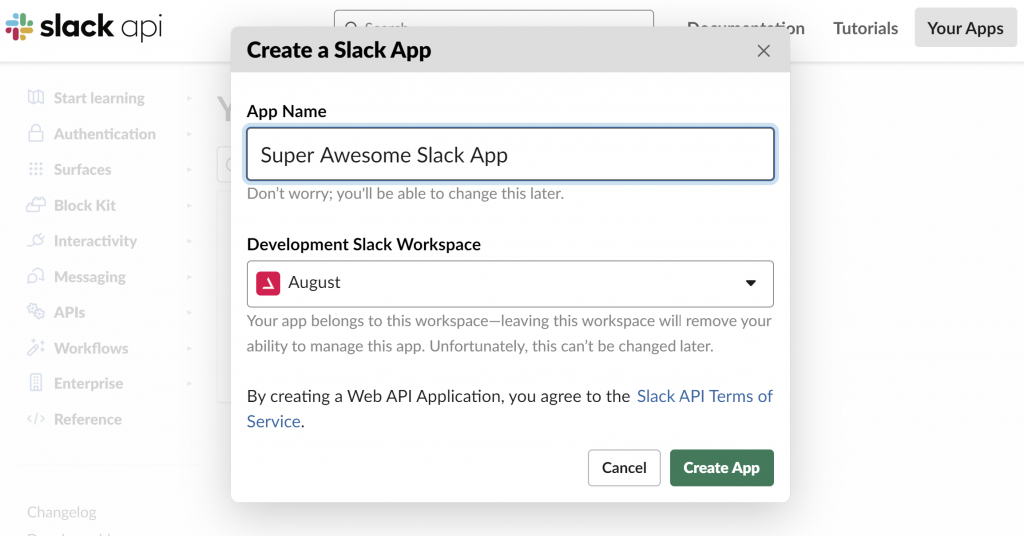
Creating a new Slack app
You have just created a Slack App!
It doesn’t do anything just yet though… you need to do one more thing to allow Google Apps Script to communicate with your App, and that’s to set up something called a ‘webhook’. Without going into too much detail, a webhook is a mechanism that allows you to send information from an external service to your Slack App.
Let’s set up our webhook. From the left hand menu, select ‘Incoming Webhooks’:
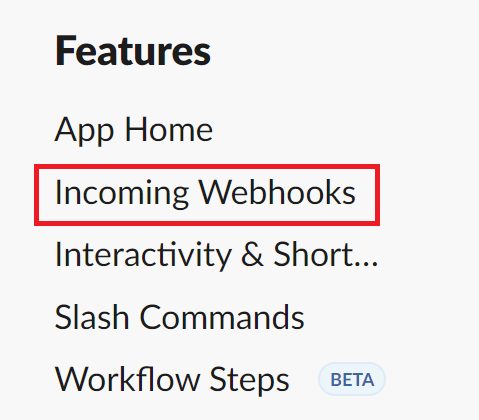
Webhooks
Toggle ‘Activate Incoming Webhooks’ to on, and then click the ‘Add New Webhook to Workspace’ button:
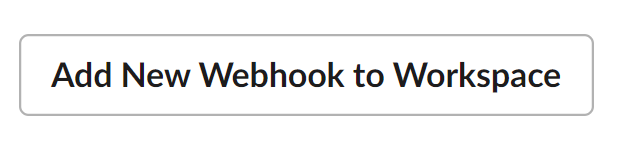
Adding your webhook
Finally, select the Slack channel that you want the Slack alert to appear in and click ‘Allow’:
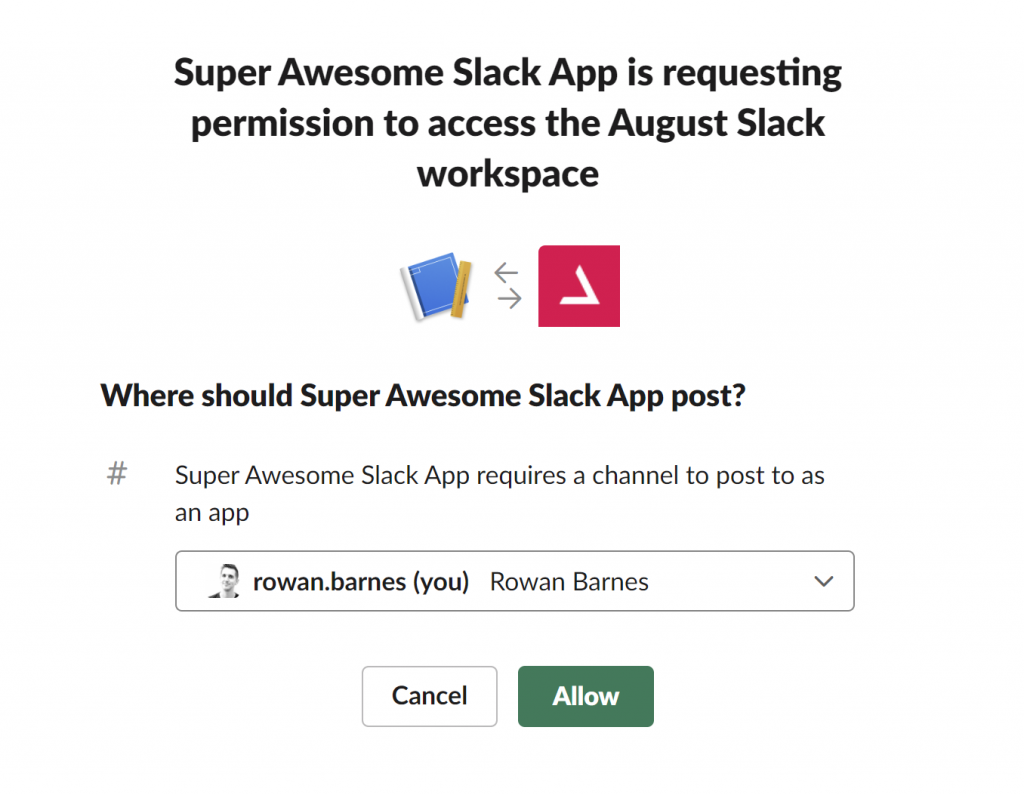
Choosing a channel
Tip: While you are testing your Slack alert, I recommend you select a Slack channel that only you have access to. This allows you to play around with how the Slack alert will appear and fix any presentation issues before you release your alert ‘in the wild’. Once you are ready to start sending alerts to a shared channel, set up a different webhook for that channel.
Your Slack App is now ready to start receiving data from an external service. Happy days! Keep this browser tab open though, you’ll need to come back to it later.
Step 2: Fetch data from your spreadsheet using Google Apps Script.
Now that you have set up your Slack App, you are ready to send it some data. For the purposes of this article, I have set up a simple Google spreadsheet with dummy data – feel free to make a copy of this spreadsheet (make sure you are logged into a Google account and then go to File > Make a copy), or alternatively use your own Google spreadsheet (either is fine).
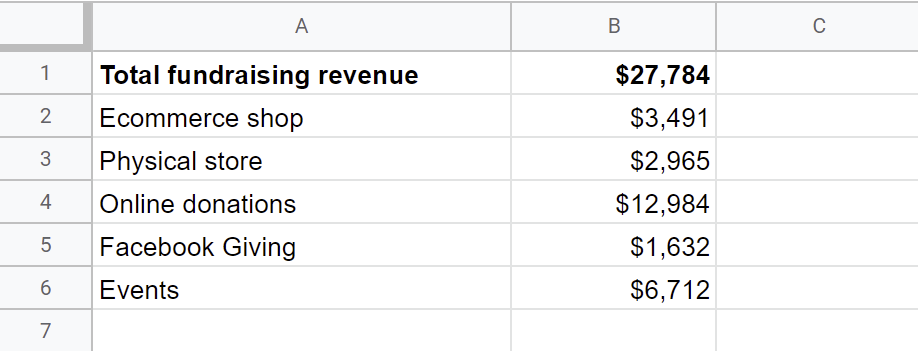
Our source data spreadsheet
Our dummy data is for a fictional charity. The spreadsheet contains a simple table listing fundraising revenue for the past month. You want to get this data into a Slack alert.
Once your spreadsheet is ready, you need to access Google Apps Script. To do that, click Tools > Script editor:
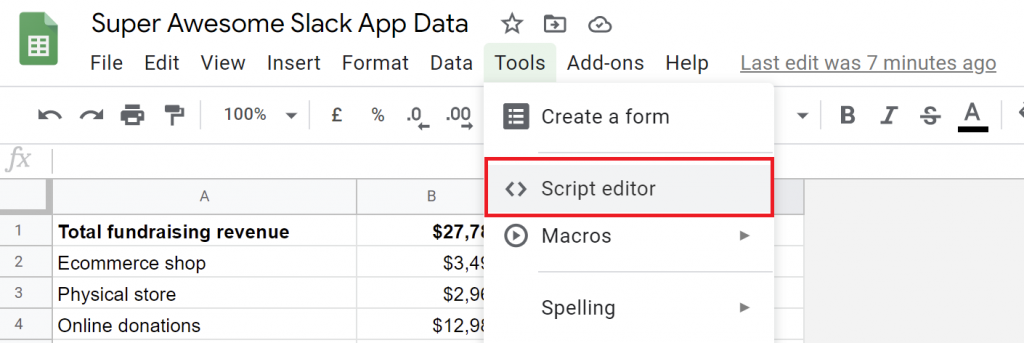
Opening the Script editor
Note: If you copied the template spreadsheet above, all of the required code will already be in place (well, all apart from your webhook URL, which we’ll get to in step 4). If, however, you are starting from scratch with your own spreadsheet, the script editor will be empty and you will need to follow the steps below to set things up.
To get started, give your script a meaningful name, and then replace the empty function at the top with the following:
function buildReport() {
  const ss = SpreadsheetApp.getActive();
  let data = ss.getSheetByName('Data').getRange("A1:B6").getValues();
  let payload = buildAlert(data);
  sendAlert(payload);
}
This is your master function. It is a very simple function which, if you have any experience of Apps Script, you will likely recognise.
This line is responsible for getting the data from cells A1:B6:
let data = ss.getSheetByName('Data').getRange("A1:B6").getValues();If you are using your own spreadsheet, just update the range to reflect your own data.
Once you have your data, the function sends that data to another function called ‘buildAlert’ (which we will talk about in step 3), and then sends the returned data from the buildAlert function to another function called ‘sendAlert’ (which we will talk about in step 4).
That’s it. You now have data, so you’re ready to start transforming that data into the right format.
Step 3: Transform the data into a format understandable by Slack.
The data you just fetched in the previous step is in JavaScript array format. You can’t send it to Slack in this format – Slack won’t understand it. Instead, it needs to be converted into specially-structured JSON that Slack will understand. Slack calls this structure ‘Blocks‘. Slack’s documentation is great, so I won’t repeat it here. Simply take a quick peek at the link above, and then come back here.
When you’re ready, let’s create our ‘buildAlert’ function which takes our data from step 2 as an argument:
function buildAlert(data) {
  let totalRevenue = data[0][1];
  let revenueBreakdown = data.slice(1).map(function(row) {
    return row[0] + ": $" + row[1];
  }).join("\n");

  let payload = {
    "blocks": [
      {
        "type": "section",
        "text": {
          "type": "mrkdwn",
          "text": ":bell: *Fundraising Revenue Report* :bell:"
        }
      },
      {
        "type": "divider"
      },
      {
        "type": "section",
        "text": {
          "type": "mrkdwn",
          "text": "Our total fundraising revenue for the past month was $" + totalRevenue
        }
      },
      {
        "type": "section",
        "text": {
          "type": "mrkdwn",
          "text": "A breakdown of revenue by source is as follows:"
        }
      },
      {
        "type": "section",
        "text": {
          "type": "mrkdwn",
          "text": revenueBreakdown
        }
      }
    ]
  };
  return payload;
}
This is a slightly longer function than our first, so let’s break it down. You want your Slack alert to look like this:
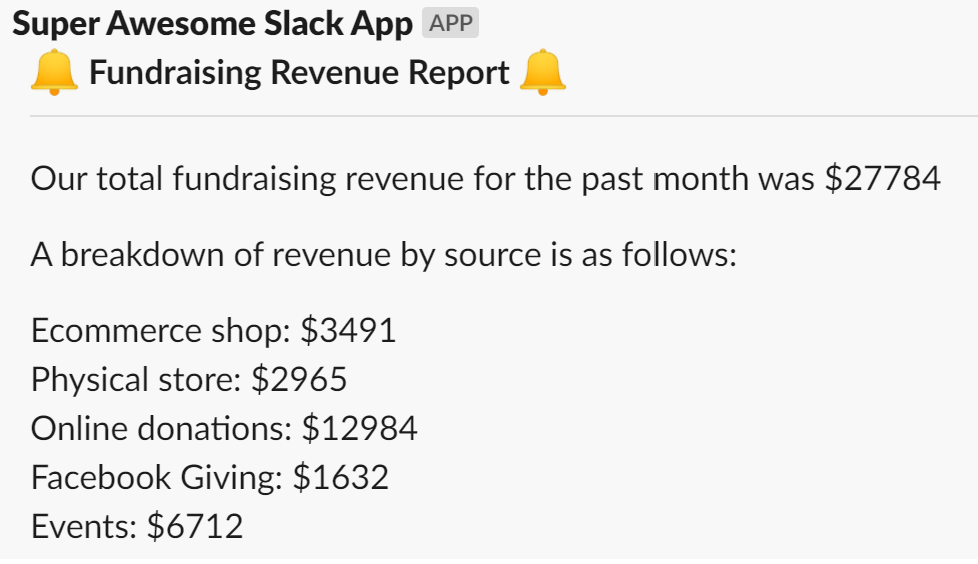
What we want our alert to look like
As you’ll see, our alert has 5 sections:
- The alert title
- The horizontal divider below the title
- The ‘total fundraising revenue’ sentence
- The sentence introducing our breakdown of revenue
- The breakdown of revenue itself
Each of the above elements is represented by an object within the “blocks” array of your ‘payload’ variable:
let payload = {
    "blocks": [
      {
        "type": "section",
        "text": {
          "type": "mrkdwn",
          "text": ":bell: *Fundraising Revenue Report* :bell:"
        }
      },
      {
        "type": "divider"
      },
      {
        "type": "section",
        "text": {
          "type": "mrkdwn",
          "text": "Our total fundraising revenue for the past month was $" + totalRevenue
        }
      },
      {
        "type": "section",
        "text": {
          "type": "mrkdwn",
          "text": "A breakdown of revenue by source is as follows:"
        }
      },
      {
        "type": "section",
        "text": {
          "type": "mrkdwn",
          "text": revenueBreakdown
        }
      }
    ]
  };
As you can see, building the structure of an alert is fairly simple. Each section within the alert is just an element in the ‘blocks’ array. If you want to add another section, just insert another element into the array!
Tip: Slack’s Block Kit Builder is an awesome place to experiment with the JSON format. Play around with things in there before you set up your ‘payload’ variable in Apps Script.
You might have noticed we skipped a few lines in our function. Let’s cover those off now.
The first line in our function simply gets your ‘total revenue’ figure from your data, which is in the first row and second column of our data array (remembering that JavaScript arrays are zero-based i.e. the ‘0’ = row 1 and the ‘1’ = column 2).
let totalRevenue = data[0][1];The subsequent code block takes the remaining data in the array (representing range A2:B6 in the spreadsheet) and turns it from an array into a text string, formatted the way we want:
let revenueBreakdown = data.slice(1).map(function(row) {
    return row[0] + ": $" + row[1];
  }).join("\n");
For those of you using your own data, you might need to play around with this section of code to get things looking right.
Step 4: Send the alert to Slack.
Step 3 is probably the hardest part, and once you’ve got that mastered, the rest is a breeze. Our final function is your ‘sendAlert’ function, which – you guessed it – sends the formatted alert to Slack. Here it is:
function sendAlert(payload) {
  const webhook = ""; //Paste your webhook URL here
  var options = {
    "method": "post",
    "contentType": "application/json",
    "muteHttpExceptions": true,
    "payload": JSON.stringify(payload)
  };

  try {
    UrlFetchApp.fetch(webhook, options);
  } catch(e) {
    Logger.log(e);
  }
}
As you’ll see, sendAlert takes the payload you just created in step 3 as an argument. The ‘options’ object simply makes sure we are making the right type of request, in the right format, then the ‘UrlFetchApp.fetch’ part makes the request. We wrap it in a try/catch block, just in case something goes wrong.
The only part you need to do is paste in your webhook URL that you created in step 1. You can get that from your app’s ‘incoming webhooks’ page that we talked about in step 1:
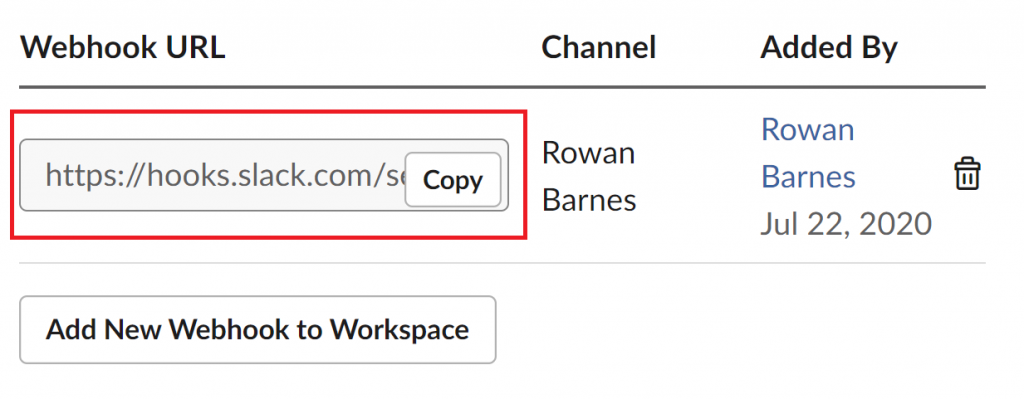
Getting your webhook URL
Once you’ve pasted that in to the ‘webhook’ variable, you’re done! That’s all the code you need.
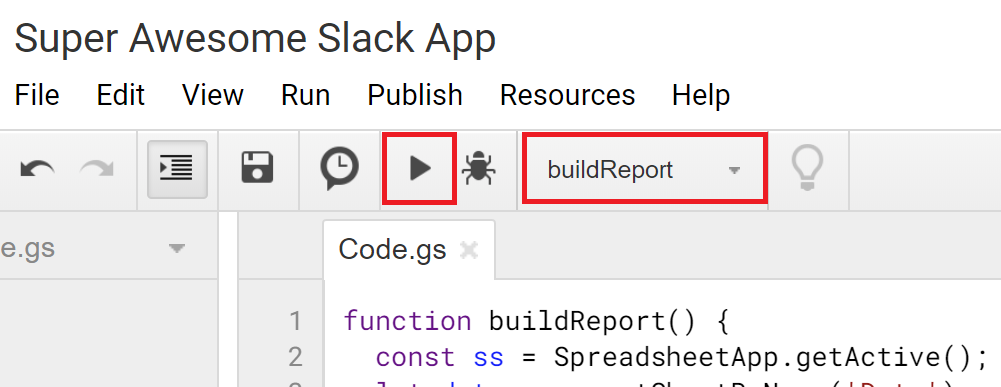
The final step is to give it a test. In Apps Script, select the ‘buildReport’ function from the toolbar, and click the Run icon:
Let’s give it a whirl!
Note that the first time you do this, Apps Script will ask you for permission to run the script. If you see a modal that looks like this:
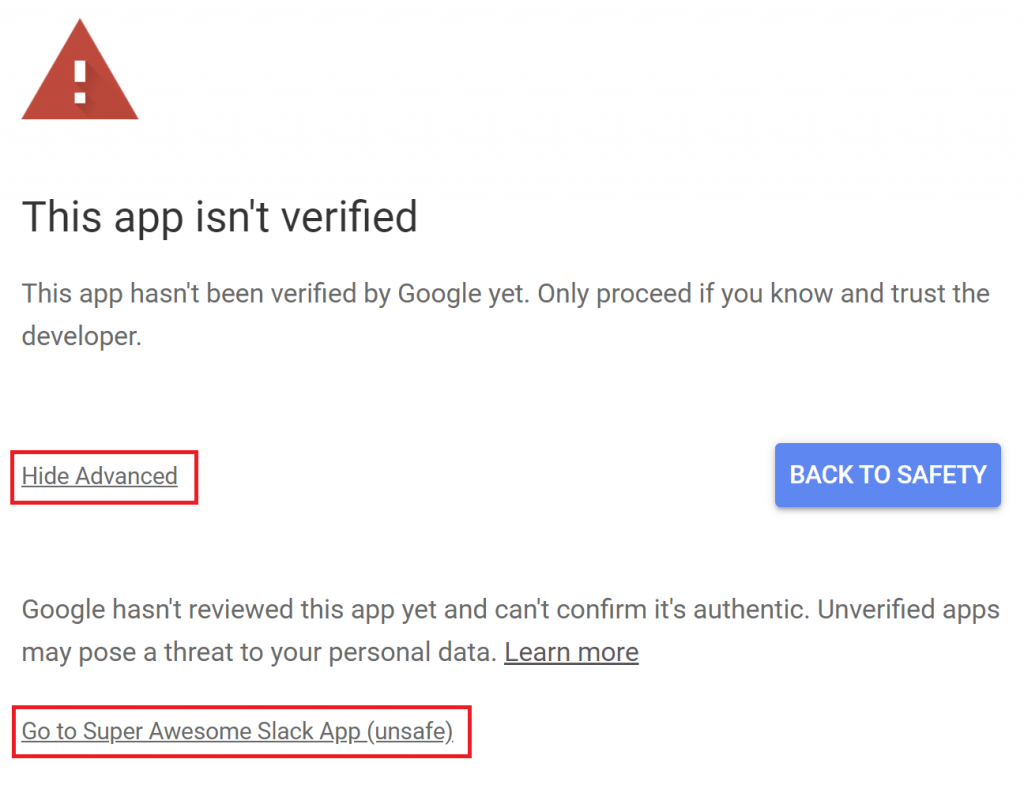
Skipping through the security warning
…just go ahead and click on ‘Advanced’ followed by ‘Go to Super Awesome Slack App (unsafe)’ (or whatever you called your script in step 2). Don’t worry about the annoyingly worded ‘unsafe’ warning – this very simple app is not unsafe! You will also only have to do this once.
Once you’ve accepted all the permissions and the script has run, head on over to Slack, and voila, the Slack alert should be sitting there in the channel you chose in step 1.
Bonus step: Set up scheduled alerts.
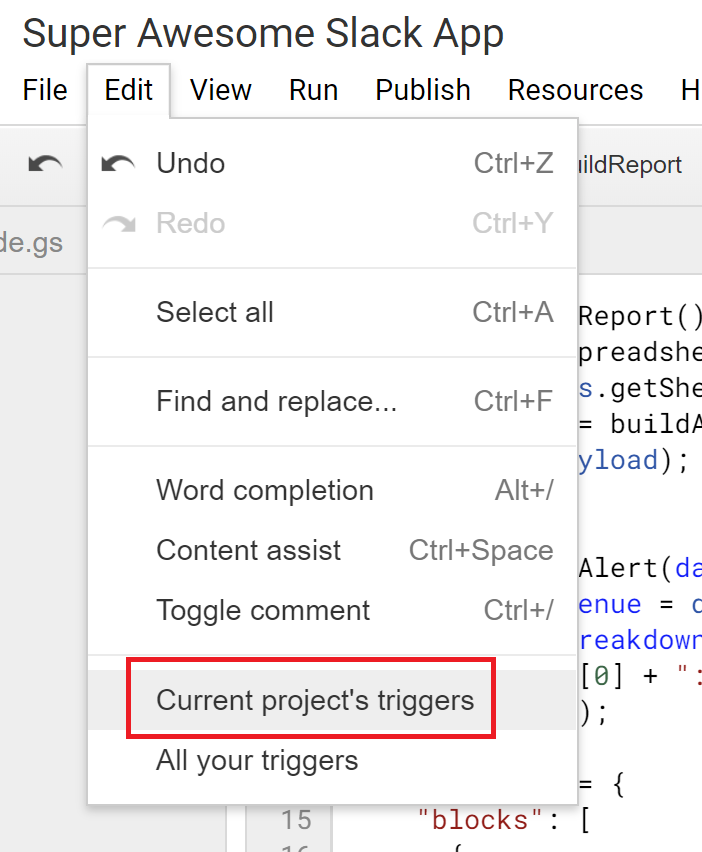
Setting up scheduled alerts is incredibly useful. Imagine you want to send an alert once per week. You can set up a ‘trigger’ within Apps Script to make that happen.
To set up a trigger, select ‘Current project’s triggers’ from the Edit menu and then set up a ‘Time Driven’ trigger on the ‘buildReport’ function, setting the frequency to whatever makes sense to you:
Adding a trigger
Obviously this would be pretty pointless with our example spreadsheet because it only contains static data. But for those of you with spreadsheets that are dynamically updating over time, a regular alert in Slack informing you and your team of the latest information could be pretty useful. No more data hidden away in sheets – your whole team has data at their fingertips, when they need it, right there in Slack.
***
That’s it! I hope you found this post useful. Take care, happy coding, and good luck!
More Articles
Up for some more?
Get your monthly fix of August happenings and our curated Super8 delivered straight to your inbox.
Thanks for signing up.
Stay tuned, the next one isn't far away.
Return to the blog.